Esp8266 Tempurature With Home Assistant
Setting up Adafruit’s Feather Huzzah esp8266 with tempurature sensor and Home Assistant with MQTT broker
Tempurature recording
Our garage refridgerator was having issues keeping food cold. So we grabbed a tempurature recorder that ran off a battery and stuck it in the freezer for a couple of days and then the fridge part for another couple of days. Upon each relocation, we captured the minium and maximum tempuratures. Turns out our fridge did not have the “garage mode”. So we got rid of the unit and bought a new one with a “garage mode”, but this required setting a dial to differnt positions between 1 to 5 based on overall ambiant temperature of the room, which is our garage.
So I decided to improve our tempurature recording with the Feather Huzzah ESP8266 and three 1-wire waterproof sensors and using Home Assistant to record the values.
Wiring
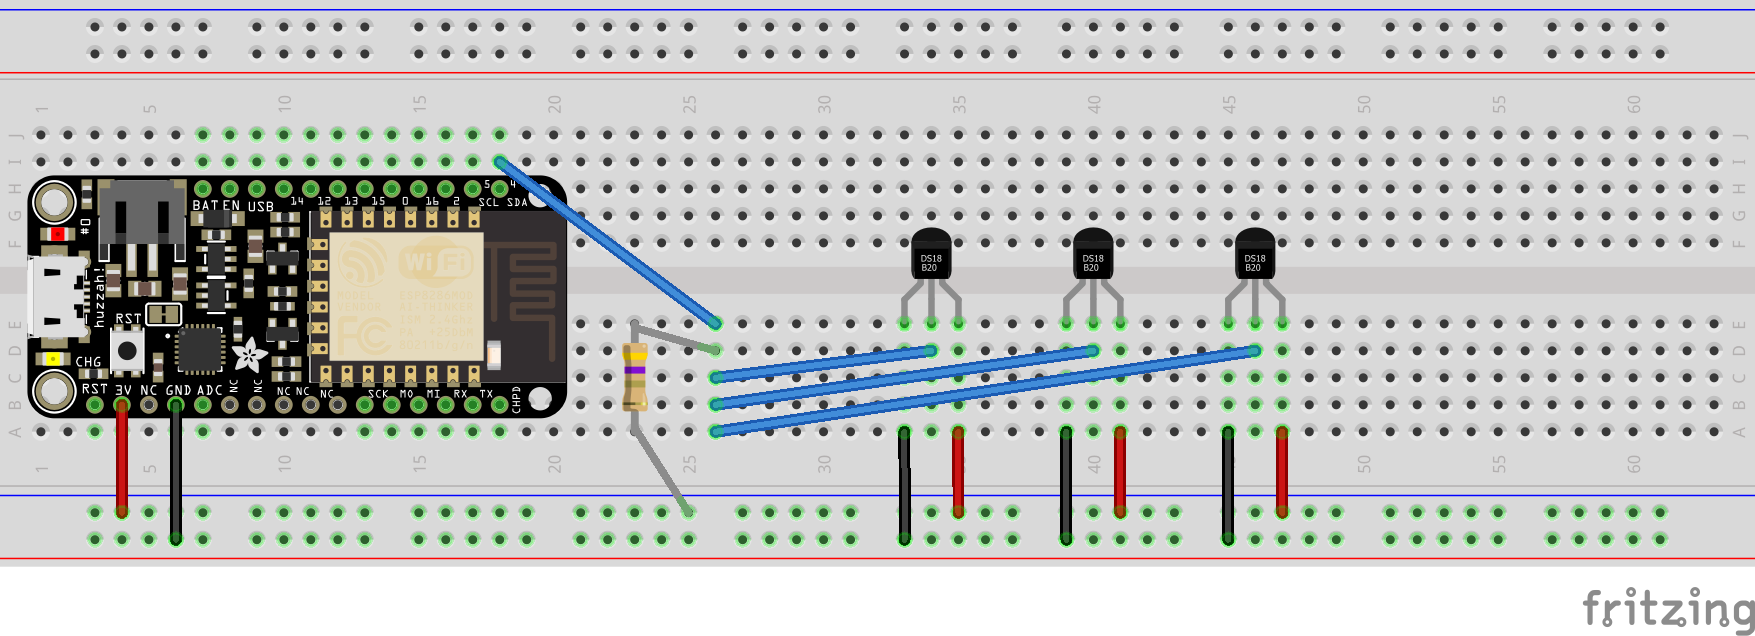
Below is what I endded up wiring up the three sensors. I am by no means any good with electronics and this setup could very well be totally incorrect, but its working for now.

Take note of using pin 4 in the wiring diagram which is also referenced in the code below in the section called dallas.
ESPHome and Home Assistant
The great thing about ESPHome is the simple configuration file you provide. After installing the ESPHome addon, I created a board and pretty much followed these steps to get a board configured:
- install esphomeflasher:
- https://github.com/esphome/esphome-flasher
pipenv install esphomeflasher
- connect a cable between the feather huzzah esp8266 and the mac/linux host
- test if the port exists:
ls -al /dev | grep usb- if the port does not show up, unplug the port from the mac side, and plug it back in
- do not use the side that is the feather huzzah as the mac will not sense the change in voltage to refresh the ports
- download the .bin file from Home Assistant:
- Goto Home Assistant
- Select ESPHome
- Create/Select the config
- Compile the config
- After compiling, there should be an option to Download bin file
- The file’s name will be the name of the sensor
- Use this file in the next step
- push the .bin to the feather huzzah:
esphomeflasher --esp8266 ~/Downloads/test.bin
- show logs of the feather huzzah:
esphomeflasher --esp8266 --show-logs ~/Downloads/test.bin
esphome:
  name: garage_board
  platform: ESP8266
  board: huzzah

wifi:
  ssid: !secret wifi_name
  password: !secret wifi_password

  # Enable fallback hotspot (captive portal) in case wifi connection fails
  ap:
    ssid: "Garage Board Fallback Hotspot"
    password: "pLfso2f2APHu"

captive_portal:

# Enable logging
logger:

# Enable Home Assistant API
api:
  password: !secret ota_password

ota:
  password: !secret ota_password

mqtt:
  broker: !secret mqtt_broker_ip
  username: !secret mqtt_user
  password: !sevret mqtt_password
  topic_prefix: 'garage_board/feeds'
  birth_message:
  will_message:
  log_topic:

dallas:
  - pin: 4
    update_interval: 60s

sensor:
  - platform: dallas
    # Find this value by running your device with this sensor node commented out
    # It will show a Dallas Address in the logs
    address: 0x84011453D285AA28
    name: "Garage Freezer"
    filters:
    - lambda: return x * (9.0/5.0) + 32.0;
    unit_of_measurement: "°F"
  - platform: dallas
    # Find this value by running your device with this sensor node commented out
    # It will show a Dallas Address in the logs
    address: 0x5F0114541364AA28
    name: "Garage Fridge"
    filters:
    - lambda: return x * (9.0/5.0) + 32.0;
    unit_of_measurement: "°F"
  - platform: dallas
    # Find this value by running your device with this sensor node commented out
    # It will show a Dallas Address in the logs
    address: 0xD30114542BFBAA28
    name: "Garage Room"
    filters:
    - lambda: return x * (9.0/5.0) + 32.0;
    unit_of_measurement: "°F"
binary_sensor:
  - platform: gpio
    name: "USB Power"
    pin:
      number: 12